It is currently Tue Sep 22, 2026 7:36 pm


All times are UTC - 5 hours [ DST ]


Post new topic Reply to topic  [ 7 posts ] 
Author Message
 Post subject: Photo Restoration tips
PostPosted: Mon Jan 05, 2026 8:38 pm  (#1) 
Offline
GimpChat Member
User avatar

Joined: Jan 01, 2026
Posts: 757
Attachment:
main-image.jpg
main-image.jpg [ 140.06 KiB | Viewed 5741 times ]

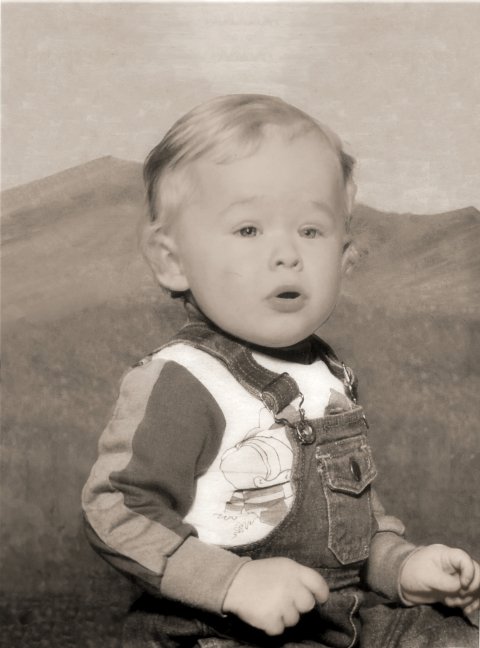
Little story about this photo, and why I restored it back to its original state, the best
I could do with what I had to work with. This little boy died in a house fire trying to
save his cat at the time the house was burning. I don't know all the details, but this
is the only picture his mother has of him. As you can see, it had been on the wall for
some time, before they decided to take it down and save it. The photo itself was a
8" x 10"

Here is the just of the process I did.
1. Used a camera to retake the photo to resize it for editing.
2. Created a Mask to even out the tone of the image, so the darker border from the
frame to match the rest of the image.
3. Used the cloning tool to remove all the spots and defects.
4. Remove the unfixable places.
5. Change the contrast to check everything a few times on a duplicated layer
to check for quality work.
6. Then change to a grayscale with toning and brightness set the way I wanted.
7. Then apply a light sepia tone to help with colors.

Attachment:
main-image 02.jpg
main-image 02.jpg [ 191.01 KiB | Viewed 5741 times ]


8. For the face I have to touch up the eyebrows, because they were to light.
9. Changed the background with a new style, with what was there, removing the
barely seeing clouds.
10. The I fixed the lower parts of field under the mountain.

Tip here: anytime you have a part of the image that is unfixable, you go and find it
on the Internet has use as a patch and blend it in.

11. Then I fixed his clothes, had to find a few things to correct them.

Attachment:
main-image 03.jpg
main-image 03.jpg [ 268.5 KiB | Viewed 5736 times ]


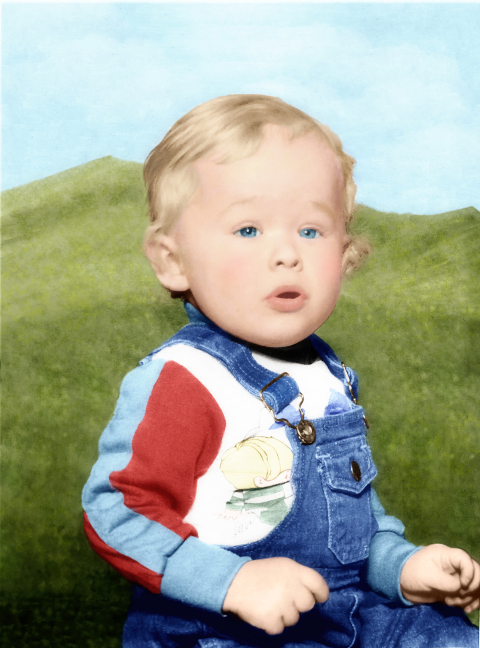
12. I started with the jeans first for coloring, by getting the colors from other jeans
for that type from images on the Internet.
13. Same with the shirt, look on the Internet for those colors any applied them
14. Then I colored the hands and face.
15. Next, I did the hair, which was a little tricky because of the far-left side and right side.
16. Colored the eyes.
17. The green field was painted in.
18. Colored the sky.
19. Adding small about of toning (shading) in places to make it believe-able.
20. Touch up colors in places like, the cheeks, non-showing shades to take as much flatness as
possible.

One thing I could not find on the internet to fix, was another cheek to match his face to blend
into to his right side to unflatten it.

Same with red eye, if there not fixable, go and find them on the internet.
Total time: about 40 Hrs.

_________________
Image
Gimp 3.2.4 with Nik Collection and G'mic-QT
Windows 11 Pro with 32 Gigs of RAM
Intel(R) Core(TM) Ultra 7
Previous Paint Shop Pro User v9 - 2023


Share on Facebook Share on Twitter Share on Orkut Share on Digg Share on MySpace Share on Delicious Share on Technorati
Top
 Post subject: Re: Photo Restoration tips
PostPosted: Mon Jan 05, 2026 9:50 pm  (#2) 
Offline
Global Moderator
User avatar

Joined: Apr 01, 2012
Posts: 8471
Location: On the other side of your screen
Very nice Tea Mouse :)

_________________
Image
Free Fun Photo Editing & resources
Poems from the Lord
Gimp Newby
Gimp version 3.2.4 and GMIC-Qt 4.0.2 OS :- Windows 10 Home 64


Top
 Post subject: Re: Photo Restoration tips
PostPosted: Tue Jan 06, 2026 12:28 am  (#3) 
Offline
GimpChat Member
User avatar

Joined: Dec 09, 2018
Posts: 738
Wow that's a good restoration.


Top
 Post subject: Re: Photo Restoration tips
PostPosted: Tue Jan 06, 2026 3:19 am  (#4) 
Offline
GimpChat Member

Joined: Apr 11, 2024
Posts: 314
A lot of work - but very impressive result.
Thanks for showing.


Top
 Post subject: Re: Photo Restoration tips
PostPosted: Tue Jan 06, 2026 4:48 am  (#5) 
Offline
GimpChat Member

Joined: Jan 07, 2025
Posts: 14
Great result. A few suggestions. The first is to use AI for these types of photos. As you mentioned, using a mask to correct the colors is fine in this case. Then you can try optimizing the original photo with AI (Artguru). Using this AI, blend the hair from the original photo into the result, as the hair looks a bit flat after using this AI. To easily remove spots and tears, 'experte.com/image-cleaner/text-remover' is a good option. Nothing wrong to use AI in your workflow. Then you can use GIMP to further refine the photo, adjust the colors and other things.


Attachments:
main-image Artguru c.jpg
main-image Artguru c.jpg [ 421.7 KiB | Viewed 5702 times ]
Top
 Post subject: Re: Photo Restoration tips
PostPosted: Tue Jan 06, 2026 7:12 am  (#6) 
Offline
GimpChat Member

Joined: Mar 27, 2025
Posts: 6
Luminar Neo 15sec


Attachments:
main-image_Restored Luminar Neo1.jpg
main-image_Restored Luminar Neo1.jpg [ 3.99 MiB | Viewed 5674 times ]
main-image_Restored Luminar Neo1.jpg
main-image_Restored Luminar Neo1.jpg [ 3.99 MiB | Viewed 5674 times ]
Top
 Post subject: Re: Photo Restoration tips
PostPosted: Tue Jan 06, 2026 2:02 pm  (#7) 
Offline
GimpChat Member
User avatar

Joined: Jan 01, 2026
Posts: 757
At the time I did this, there was no AI to help with the photo. I asked her about the eye color and the color of the shirt he was wearing at the time
that she could remember. That's why the shirt is red and blue. I do agree the AI did a great job and a better job than I could do. What AI did you use.
The shirt color of the character, I was able to actual find it and go with those colors. It would be easy to colorize those from what you posted. Thanks for the input.
Good or bad.

_________________
Image
Gimp 3.2.4 with Nik Collection and G'mic-QT
Windows 11 Pro with 32 Gigs of RAM
Intel(R) Core(TM) Ultra 7
Previous Paint Shop Pro User v9 - 2023


Top
Post new topic Reply to topic  [ 7 posts ] 

All times are UTC - 5 hours [ DST ]


cron

* Login  


Powered by phpBB3 © phpBB Group