It is currently Fri Aug 07, 2026 10:42 am


All times are UTC - 5 hours [ DST ]


Post new topic Reply to topic  [ 16 posts ] 
Author Message
 Post subject: Recreating bevel effect from Sonic logo
PostPosted: Tue Apr 30, 2024 5:43 am  (#1) 
Offline
New Member

Joined: Apr 30, 2024
Posts: 4
GIMP Version: 2.10.34
Operating System: Windows
OS Version: Windows 10
GIMP Experience: Intermediate Level

List any relevant plug-ins or scripts:
GEGL Effects CE


Hi, I'm new here but I've been using GIMP on and off for many years. I'm trying to help a friend recreate the Sonic the Hedgehog 2 game logo using different text, but I'm having a lot of trouble trying to get the bevel shading close to how the original logo looks.
Attachment:
File comment: Logo Reference
969acd75-b08e-4a9f-a385-64b791fa793c-1145634357.png
969acd75-b08e-4a9f-a385-64b791fa793c-1145634357.png [ 177.59 KiB | Viewed 3324 times ]


I've made very good progress so far by using contrast_'s GEGL Layer Effects Bevel plugin on the blue inner text, however I'm stuck with how to move forward on the orange text. No matter how much I play with it, I can't get it to match that well to the reference image. I've added a little shading to the outer edges because it looks like the reference picture has some that's not a part of the lighting from the bevel, but that's non-permanent and can be removed if needed. I was also having trouble trying to add bevels inside the A letters, it seemed like maybe the plugin wasn't drawing anything inside.
Attachment:
File comment: Current progress
gimp-2.10_TRBQvjqWm8.png
gimp-2.10_TRBQvjqWm8.png [ 30.59 KiB | Viewed 3324 times ]


Any guidance on how I can achieve the effect I'm looking for would be appreciated!


Share on Facebook Share on Twitter Share on Orkut Share on Digg Share on MySpace Share on Delicious Share on Technorati
Top
 Post subject: Re: Recreating bevel effect from Sonic logo
PostPosted: Tue Apr 30, 2024 12:07 pm  (#2) 
Offline
GimpChat Member
User avatar

Joined: Oct 31, 2020
Posts: 2013
Hi, thanks for using my plugin. There is a faint redish orange outline after the blue text before the other large orange outline is bevelled


I recreated this style in the latest GEGL Effects.

Attachment:
2024-04-30_13-02.png
2024-04-30_13-02.png [ 138.71 KiB | Viewed 3298 times ]


Save this as a text file (.txt) and open it in GEGL Effects Continual by importing presets
if it doesn't work it means you have an outdated version of GEGL Effects and need to update

https://github.com/LinuxBeaver/GEGL-Eff ... L/releases

# GIMP 'GEGL Effects Continual Edition (lb:layereffectscontinual)' settings

(time 0)
(gimp-region drawable)
(guichange extraosg)
(optioncolor
    (color "HSV double" 24 "K\140\323\176\262e\345\77\43\237u\203\251\314\355\77\236\32\62\100b\1\347\77" 0))
(colorblendmode SolidColor)
(enableoutline yes)
(opacitystroke 0.999)
(grow-shape circle)
(radiusstroke 1.401)
(grow-radiusstroke 2)
(colorstroke
    (color "HSV double" 24 "\100\254\274\371\267\33\257\77\255\33L\221O\54\357\77f\222\23a\134x\356\77" 0))
(opacity 0)
(x 10)
(y 10)
(color
    (color "R'G'B'A float" 16 "\0\0\0\0\0\0\0\0\0\0\0\0\0\0\200\77" 0))
(grow-radius 0)
(radius 12)
(clippolicy no)
(depth 54)
(bevel1 30)
(radius1 2.1720000000000002)
(slideupblack 0)
(bevelopacity 0.999)
(typebevel normalbevel)
(blendmodebevel2 BevelOff)
(innerglow no)
(blendmodeinnerglow2 Over)
(innergradius 4.5)
(innerggrow-radius 5)
(innergopacity 1.3999999999999999)
(innergvalue
    (color "R'G'B'A float" 16 "\0\0\200\77\220\217\17\77\0\0\0\0\0\0\200\77" 0))
(xinnerglow 0)
(yinnerglow 0)
(fixoutline 75)
(src "")
(imageblendmode NormalImage)
(layeropacity 0.999)
(hue 0)
(chroma 0)
(lightness 0)
(gradient no)
(blendmodegradient2 Over)
(opacitygradient 0.999)
(start-x 659)
(start-y 49)
(end-x 647)
(end-y 572)
(start-color
    (color "R'G'B'A float" 16 "\322\320P\76\355\353k\77\330\326V\77\0\0\200\77" 0))
(end-color
    (color "R'G'B'A float" 16 "\0\377\176\77\302\300\300\75\364\362r\77\0\0\200\77" 0))
(xstroke -0.96399999999999997)
(ystroke 0.441)
(specialoutline yes)
(blendmodebeveloutline GrainMergeGE)
(osdepth 12)
(osbevel 80)
(osradius 3)
(osbevelopacity 0.27000000000000002)
(ossrc "")
(oshue 0)
(oslightness 0)
(specialshadowoptions no)
(shadowimage "")
(blurshadowimage 0)
(enableaura no)
(aurasize 10)
(seedaura 0)
(enableshine no)
(blendmodeshine Replace)
(opacityshine 0.5)
(x-scaleshine 28)
(y-scaleshine 56)
(complexity 0.80000000000000004)
(blend-power -0.59999999999999998)
(seedshine 0)
(microblur 0)
(thinboldenable 0)
(thinboldap 50)
(knockout 0)
(enableextraoutline yes)
(opacitystrokeextraoutline 0.999)
(xextraoutline 0)
(yextraoutline 0)
(grow-shapeextraoutline circle)
(radiusstrokeextraoutline 0)
(grow-radiusstrokeextraoutline 20)
(colorstrokeextraoutline
    (color "HSV double" 24 "\250t\275\202\137\372\272\77L\221\317\272\301\255\357\77\0\0\0\0\0\0\360\77" 0))
(specialoutlineextra yes)
(blendmodebeveloutlineextra MultiplyGE)
(osdepthextra 50)
(osbevelextra 85.400000000000006)
(osradiusextra 2.2149999999999999)
(osbevelopacityextra 0.33700000000000002)
(ossrcextra "")
(enableglasstext yes)
(glassblendmode GlassOver)
(glassazimuth 150.78999999999999)
(glassdepth 10)
(glasselevation 43.186)
(glassretract 1)
(glassblur 0.5)
(glasscolor
    (color "R'G'B'A float" 16 "\0\0\200\77\0\0\200\77\0\0\200\77\0\0\200\77" 0))
(glassopacity 0.89400000000000002)

# end of 'GEGL Effects Continual Edition (lb:layereffectscontinual)' settings


So to repeat myself more clearly the text file above is instructions for GEGL Effects to create this text style but it only works on the latest version.


Last edited by contrast_ on Tue Apr 30, 2024 12:20 pm, edited 1 time in total.

Top
 Post subject: Re: Recreating bevel effect from Sonic logo
PostPosted: Tue Apr 30, 2024 12:18 pm  (#3) 
Offline
GimpChat Member
User avatar

Joined: Oct 31, 2020
Posts: 2013
Ok, If you want a technical answer it looks like the outline bevel in the original image is doing a box blur or something. GEGL Effects is only programmed to do a gaussian blur for its outline bevel

Attachment:
2024-04-30_13-15.png
2024-04-30_13-15.png [ 159.91 KiB | Viewed 3296 times ]


Notice the "box blur radius=`" replacing gaussian blur? GEGL Effects isn't doing that
Attachment:
2024-04-30_13-15_1.png
2024-04-30_13-15_1.png [ 143.13 KiB | Viewed 3296 times ]


The good news is that my plugin SSG can make an outline only effect and bevel that ships with GEGL Effects can do a box blur internally
https://github.com/LinuxBeaver/GEGL-SSG ... /releases/

So first apply an orange SSG and then apply bevel stand alone
Attachment:
box_bevel.png
box_bevel.png [ 140.49 KiB | Viewed 3296 times ]


Top
 Post subject: Re: Recreating bevel effect from Sonic logo
PostPosted: Tue Apr 30, 2024 6:46 pm  (#4) 
Offline
New Member

Joined: Apr 30, 2024
Posts: 4
Thanks for the reply! Your preset got me very close to what I needed, and a little tweaking later I was able to get almost exactly what I was looking for. The SSG plugin also helped adding a bit of an outline.

Attachment:
gimp-2.10_l626DOCqUb.png
gimp-2.10_l626DOCqUb.png [ 68.24 KiB | Viewed 3272 times ]


I appreciate the help!!


Top
 Post subject: Re: Recreating bevel effect from Sonic logo
PostPosted: Thu Aug 21, 2025 12:36 pm  (#5) 
Offline
New Member

Joined: Aug 21, 2025
Posts: 4
Hi there! Sorry to bump an old post, but I'm also trying to recreate the same thing and I have no idea what I'm doing...

I'm not sure how to get the window in contrast_'s second post to appear, where to find it.

The best I've been able to figure out on my own is:

do Bevel (to blend), setting radius normal bevel to as low as possible; then the initial text looks good, but it also turns it gray, and the lighting shadow is black instead of white.

I then used Colors --> Colorize to make it blue again, but... the shadow isn't quite right. And I haven't even gotten started on the border around it.

So any advice or step by steps on how to get it right, would be super appreciated!!!


Attachments:
File comment: My best try...
Clipboard02.png
Clipboard02.png [ 6.77 KiB | Viewed 2285 times ]
Top
 Post subject: Re: Recreating bevel effect from Sonic logo
PostPosted: Thu Aug 21, 2025 2:56 pm  (#6) 
Offline
GimpChat Member
User avatar

Joined: Oct 31, 2020
Posts: 2013
The T wrote:
Hi there! Sorry to bump an old post, but I'm also trying to recreate the same thing and I have no idea what I'm doing...

I'm not sure how to get the window in contrast_'s second post to appear, where to find it.

The best I've been able to figure out on my own is:

do Bevel (to blend), setting radius normal bevel to as low as possible; then the initial text looks good, but it also turns it gray, and the lighting shadow is black instead of white.

I then used Colors --> Colorize to make it blue again, but... the shadow isn't quite right. And I haven't even gotten started on the border around it.

So any advice or step by steps on how to get it right, would be super appreciated!!!


You are using bevel to blend wrong, its suppose to BLEND, using GIMP's blend modes. The only reason its gray is because you didn't manually blend it.

Image

Image

Also if you want that other window to pop up just open GEGL Effects or GEGL Effects Continual or better yet use GEGL Styles and Bevel that ships with GIMP 3.


Top
 Post subject: Re: Recreating bevel effect from Sonic logo
PostPosted: Sat Aug 23, 2025 2:12 pm  (#7) 
Offline
New Member

Joined: Aug 21, 2025
Posts: 4
I appreciate that answer, but I'm still struggling to get any sort of resemblance!

Now that I've made that change, it darkens the color instead of keeping it the same color, and still isn't adding any white reflection on the letters.

I've tried messing around with the values but they don't seem to help. I also tried to use "GEGL Effects Continual Edition" but it doesn't look like the thing in your screenshot, and messing with the sliders is still mostly just darkening the color without applying the effect...

Sorry, I'm really clueless on this, I don't know what types of things I should be trying to change. Any help is appreciated!


Top
 Post subject: Re: Recreating bevel effect from Sonic logo
PostPosted: Sun Aug 24, 2025 5:35 pm  (#8) 
Offline
GimpChat Member
User avatar

Joined: Oct 31, 2020
Posts: 2013
The T wrote:
I appreciate that answer, but I'm still struggling to get any sort of resemblance!

Now that I've made that change, it darkens the color instead of keeping it the same color, and still isn't adding any white reflection on the letters.

I've tried messing around with the values but they don't seem to help. I also tried to use "GEGL Effects Continual Edition" but it doesn't look like the thing in your screenshot, and messing with the sliders is still mostly just darkening the color without applying the effect...

Sorry, I'm really clueless on this, I don't know what types of things I should be trying to change. Any help is appreciated!


Make the text blue in GEGL Effects continual and then go to the tab "Glass Over Text" and enable that, enable Bevel and Glass Text together in GEGL Effects.

Attached are images of the same filter settings on different tabs, make sure blend mode of color overlay is set to Solid Color to easily change the color.

Image

Image

Image


Top
 Post subject: Re: Recreating bevel effect from Sonic logo
PostPosted: Sun Aug 24, 2025 5:39 pm  (#9) 
Offline
GimpChat Member
User avatar

Joined: Oct 31, 2020
Posts: 2013
GEGL Effects is a generic tool that can make 10000s of text styles, virtually anything is possible, you need to take time to familiarize yourself with it. Once it clicks you will be able to excel. Also practice with GEGL Styles too because its much simpler (Styles officially ships with GIMP3) but Styles can't do the white shine you want.


Top
 Post subject: Re: Recreating bevel effect from Sonic logo
PostPosted: Mon Aug 25, 2025 12:43 am  (#10) 
Offline
New Member

Joined: Apr 30, 2024
Posts: 4
I kept the instructions for how I made the recreation earlier in the thread. I'm not sure if these can be grouped together into like one script or anything as it's a very manual process, but it was close enough for me.

##### create blue text
NiseSegaSonic 192px font, color #192887
adjust individual character kerning until satisfied
duplicate the text layer for safe keeping
hide the original and select the duplicate text layer

##### create orange outline
right click new text layer > text to path
create a new transparent layer above the text layer
shift + Q to enable quickmask
select white as your active foreground color
edit > stroke path
Line, Foreground color, Antialiasing enabled, Line width 40.0
Stroke the line
shift + Q to disable quickmask
have the transparent layer selected if it isnt already
select > remove holes
fill selection with sonic orange color #FFA200
move outline layer underneath text layer
ctrl+shift+a or select > none to remove selection

##### bevel the blue text
right click the text layer > layer to image size
make sure the text layer is selected
tools > GEGL Operation
select drop box, select Bevel (to blend) (lb:bevel)

Normal Bevel
Radius Normal Bevel 1
Radius Box Bevel 1
Depth Angle 12.40
Depth 100
Bevel's Coverage Threshold 0.1
Rotate Lighting 145
Black Bevel Mode 0
Blending Options Mode: Linear Light
Opacity 65
by the Presets box, click the + button and name this preset something like "Sonic Blue Text Inner Bevel" to save the settings
click OK to apply the bevel filter

##### bevel the orange outline
right click the blue text layer > alpha to selection
select the orange outline layer
duplicate it, then hide the original
delete the selection on the orange outline layer
duplicate the layer again, hide the original
select > none
select the top orange layer
tools > GEGL Operation > Bevel (to blend) (lb:bevel)

Normal Bevel
Radius Normal bevel 0.5
Radius Box Bevel 2
Depth Angle 12.40
Depth 1
Bevel's Coverage Threshold 0.1
Rotate Lighting 145
Black Bevel 0
Blending Options Mode: Soft Light
Opacity 100
Save and name this as a preset by clicking the + button by the presets box at the top
click OK

select the layer underneath the one currently selected, the orange outline with the cutout inside
move it above the layer you just beveled and show the layer
tools > GEGL Operation > Add a Stroke, Shadow, or Glow

Grow Shape: Circle
Color Overlay #db6604
Horizontal and Vertical Position 0.000
Blur to create Shadow 0.50
Grow radius of SSG 1
Make the SSG inward or outward 1
Image file overlay None
Blue Image file Overlay 0
Hue Rotation for Image file overlay 0
Opacity 2.000
Blending Options Mode Replace
Opacity 80
Save and name this preset
click OK

##### should be complete, verify layers are correctly ordered
1. Blue Text with bevel applied
2. Orange outline with shadow
3. Orange outline with bevel applied


Top
 Post subject: Re: Recreating bevel effect from Sonic logo
PostPosted: Tue Aug 26, 2025 9:18 pm  (#11) 
Offline
GimpChat Member
User avatar

Joined: Oct 31, 2020
Posts: 2013
You can make an outline using my plugin "gegl effects" or my plugin "lb:stroke"

Attachment:
stroke_linux_binaries_gegl_plugin.zip [7.03 KiB]
Downloaded 29 times


Attachment:
stroke_windows_binaries_gegl_plugin.zip [32.81 KiB]
Downloaded 30 times


Attachment:
SourceCode.zip [4.18 KiB]
Downloaded 27 times


Top
 Post subject: Re: Recreating bevel effect from Sonic logo
PostPosted: Fri Sep 05, 2025 1:53 pm  (#12) 
Offline
New Member

Joined: Aug 21, 2025
Posts: 4
Hey there, finally able to find time to get started on this again. I'm following tim's directions but the only thing I'm getting stuck on, under "Bevel (to blend) (lb:bevel)", for Type of Bevel, "Normal Bevel" isn't one the options I have. I see it above in one of his screenshots. Is it part of a plugin I'm missing? An older version? I downloaded all the ones mentioned in this thread...

I'm using GIMP 2.10.38.

I tried to complete the process with Bump Bevel, but with Mode: Linear Light, it still radically changes the color. Using Mode: Burn retains the color but the final results aren't correct, there's no white shine.


Attachments:
File comment: No "Normal Bevel" type.
beveltype.png
beveltype.png [ 23.86 KiB | Viewed 1703 times ]
Top
 Post subject: Re: Recreating bevel effect from Sonic logo
PostPosted: Fri Sep 05, 2025 4:15 pm  (#13) 
Offline
Administrator
User avatar

Joined: Aug 10, 2012
Posts: 14145
Location: Native to NYC living in Arizona, Gimp 2.8 - 3.0, Win 11 PC.
I tried to create this look using the original image and came pretty close,
by filling selections, moving them around a bit and using various layer modes.

Attachment:
File comment: My example image
Wallace_969acd75-b08e-4a9f-a385-64b791fa793c-1145634357.png
Wallace_969acd75-b08e-4a9f-a385-64b791fa793c-1145634357.png [ 165.08 KiB | Viewed 1698 times ]


The bevel I added to the text was created by making selections inverting them,
and filling the inverted selection with a light color.
Gaussian Blur of 18 was used on this layer.
Color curves was used set to alpha to refine the bevel.
Set this layers mode to addition and reposition it as desired.
My final step was to make a selection of the blue text,
invert it and use this selection to remove the unnecessary outer portion of the bevel layers.


The same was done for the large orange text padding,
but with a dark color use for the bevel.

Here is the xcf file created using GIMP 2.8.18.
Attachment:
File comment: xcf file
Wallace_969acd75-b08e-4a9f-a385-64b791fa793c-1145634357.xcf [1.99 MiB]
Downloaded 31 times

_________________
Image
"A wise man learns more from a foolish question than a fool can learn from a wise answer"
Image


Top
 Post subject: Re: Recreating bevel effect from Sonic logo
PostPosted: Fri Sep 05, 2025 6:28 pm  (#14) 
Offline
Global Moderator
User avatar

Joined: May 16, 2010
Posts: 16152
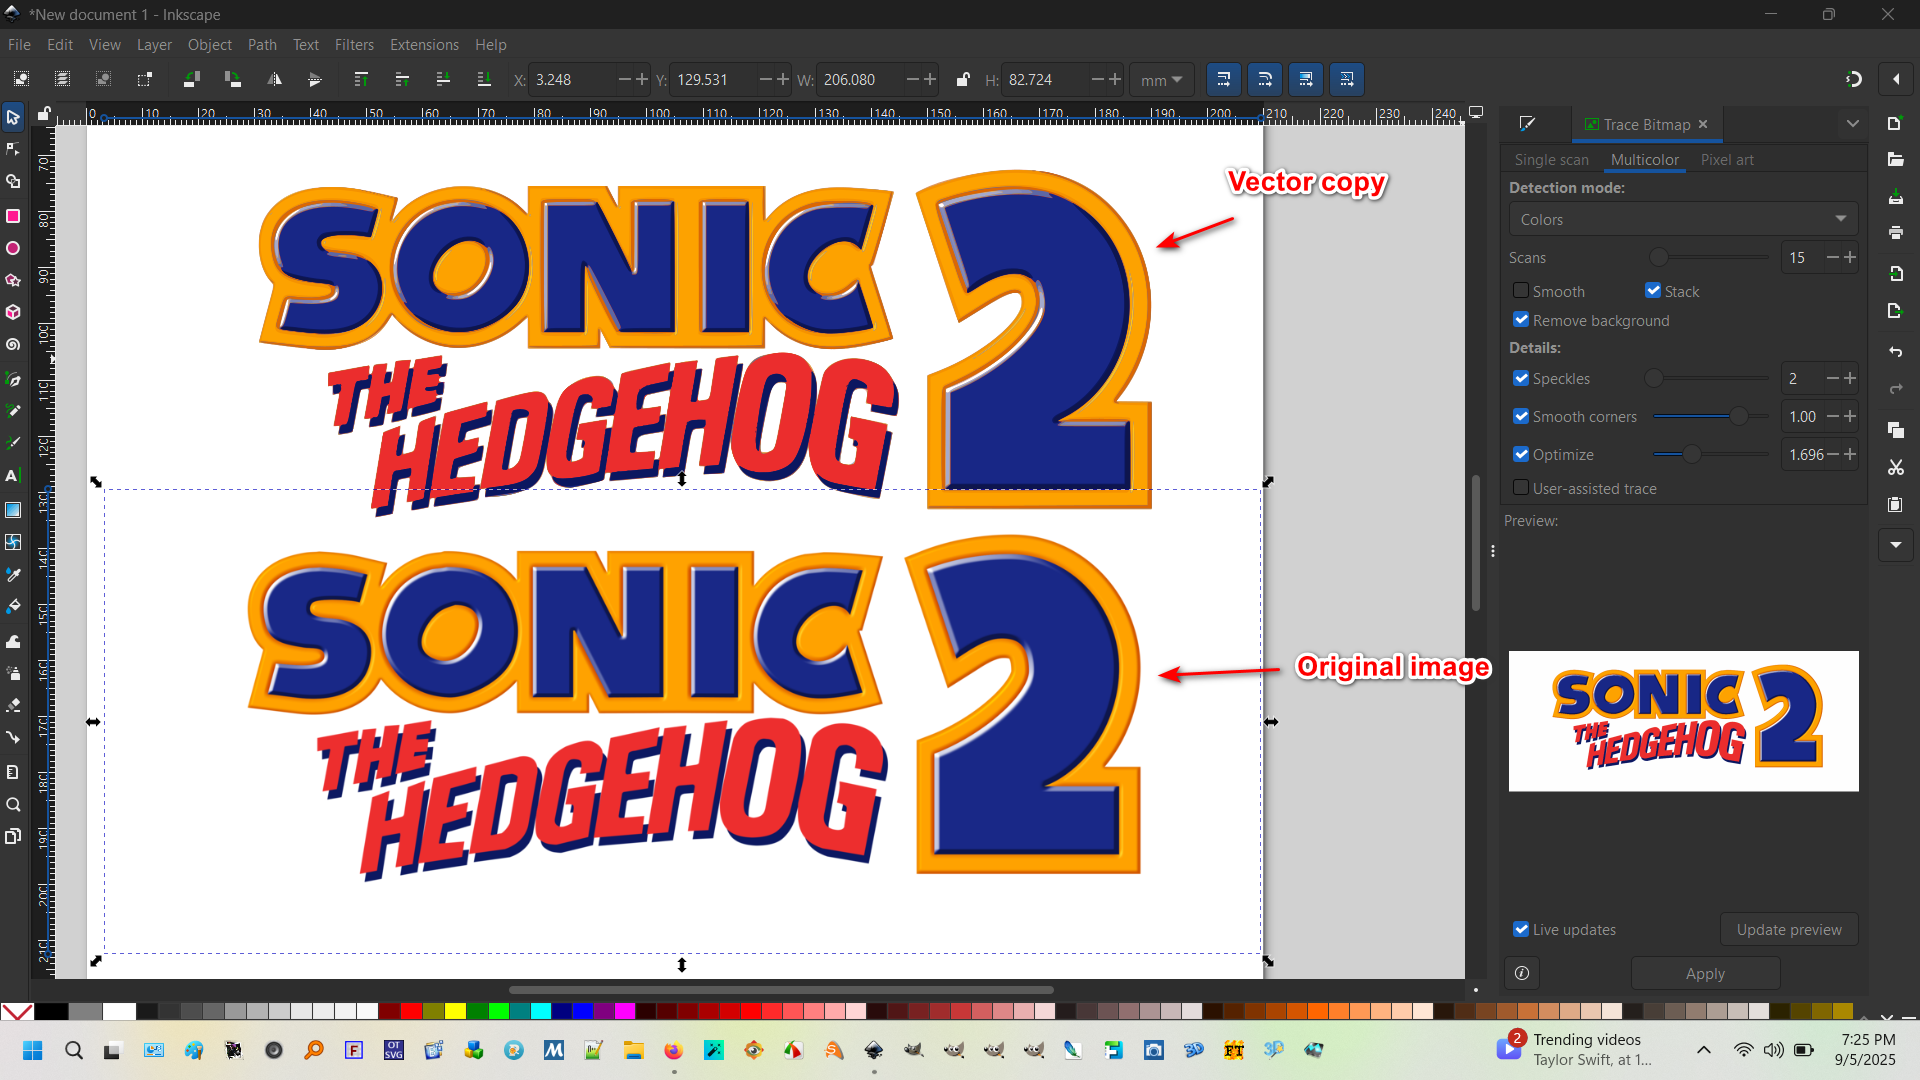
That looks really great Wallace! I think i would do a project like this in Inkscape though. Just load in the image and bitmap trace it.

Example.
Image

Then you have a resizable vector to work with. :bigthup

_________________
Image


Top
 Post subject: Re: Recreating bevel effect from Sonic logo
PostPosted: Fri Sep 05, 2025 6:38 pm  (#15) 
Offline
New Member

Joined: Aug 21, 2025
Posts: 4
I appreciate ya'lls input, but I'd really prefer if we could find a solution for the missing option in the GEGL Operation.

EDIT:
The T wrote:
Hey there, finally able to find time to get started on this again. I'm following tim's directions but the only thing I'm getting stuck on, under "Bevel (to blend) (lb:bevel)", for Type of Bevel, "Normal Bevel" isn't one the options I have. I see it above in one of his screenshots. Is it part of a plugin I'm missing? An older version? I downloaded all the ones mentioned in this thread...

I'm using GIMP 2.10.38.

I tried to complete the process with Bump Bevel, but with Mode: Linear Light, it still radically changes the color. Using Mode: Burn retains the color but the final results aren't correct, there's no white shine.

My best guess on this is the version of GEGL Effects CE from back then is different; but the Github doesn't have binaries of the older versions; the links for GE_archives.zip is broken. I believe contrast_ is the creator of the plugin, any chance they could help out here, provide the old versions? I'd really appreciate it.


Top
 Post subject: Re: Recreating bevel effect from Sonic logo
PostPosted: Sat Sep 06, 2025 2:36 pm  (#16) 
Offline
New Member

Joined: Apr 30, 2024
Posts: 4
The T wrote:
"Normal Bevel" isn't one the options I have. I see it above in one of his screenshots. Is it part of a plugin I'm missing? An older version? I downloaded all the ones mentioned in this thread...


I seem to have a previous version of the GEGL Effects CE plugin before the 2025 update on the GitHub page, there's a file that states I have the March 11th 2024 Stable Build. I don't see any releases from that time still up on the GitHub. It's possible one of the older 2023 versions might work and have the Normal Bevel option, but I haven't checked.

Is re-uploading plugin files allowed? If I need to I would, but it would probably be best if contrast_ was able to add that build back on the GitHub for posterity.


Top
Post new topic Reply to topic  [ 16 posts ] 

All times are UTC - 5 hours [ DST ]


* Login  


Powered by phpBB3 © phpBB Group