Quite a bit of re-working to this plug-in for creating custom font character files from paths...
Download, unzip and install to your Gimp 2.10 user plug-in folder.
Attachment:
A pdf version of this guide to the plug-in.
Attachment:
Some useful resources for getting started:
Attachment:
 Resources for Paths to Layers.zip [58.68 KiB]
Downloaded 1589 times
Resources for Paths to Layers.zip [58.68 KiB]
Downloaded 1589 times
This update replaces version 0.11: Versions 0.12 to 0.14b were not published.
The changes include:
generation of alternative characters from suitably named paths.
use of additional ‘path’ name for filling a path rather than stroking it (intended really for punctuation characters).
dialog options for applying gradients while stroking character paths with a brush
option for tapering strokes can be applied to closed characters
This guide only provides help with the new features above. For help with older features please refer to the earlier guide (linked below).
Version 0.11 Tabbed Guide LinkAlternative character paths
Characters can be generated by the plug-in from a skeletal path (created with the path tool) drawn in the required shape. The naming convention consists of the character name plus a suffix. If the suffix is ‘ char’ (i.e. space character plus char) then the path will be stroked with either the brush or line tool.

To generate an alternative character use the same convention and then add number 1; if you need more alternatives increase this number (up to a maximum of 9).

Should you wish to preview an alternative character enter the character, followed by the number, into the preview character text box on the last tab of the filter dialog. (The example above would require you to enter ‘a1’.
It is possible to use another name, i.e. ‘ path’, for the character suffix but this is really intended for use with the line tool when stroking paths (i.e. for creating custom font base character sets for decorating with other custom font tools). Some characters, such as punctuation marks, often simply look better this way.
Using a gradient to stroke characters
This is not the same as applying the current gradient to colour a character after it has been generated. It uses the currently selected brush to colour each section of the stroke in a colour taken from the currently selected gradient.
Select a suitable greyscale brush (usually shown in black or shades of grey in your Gimp Brushes) and set the foreground and background colours if you want to use a custom gradient. I used a brush called ‘spoke’ (also in the resource folder).
Open a custom font character paths file. (This guide uses the cursivity file.)
Call up the filter:
Filters>>Custom Fonts>>Constructing Tools>>Custom Font Paths to Layers v0.15b Tabbed...
Dialog Tab 1:

Set the ‘Primary stroke size’ to value of between 40 and 50.
Set the ‘Secondary stroke size’ to 100.
Click on the ‘Gradient for stroking’ icon to activate the Gimp gradient selector dialog. Use this to select a gradient. (I used a gradient with rainbow colours.)
Dialog Tab 2:
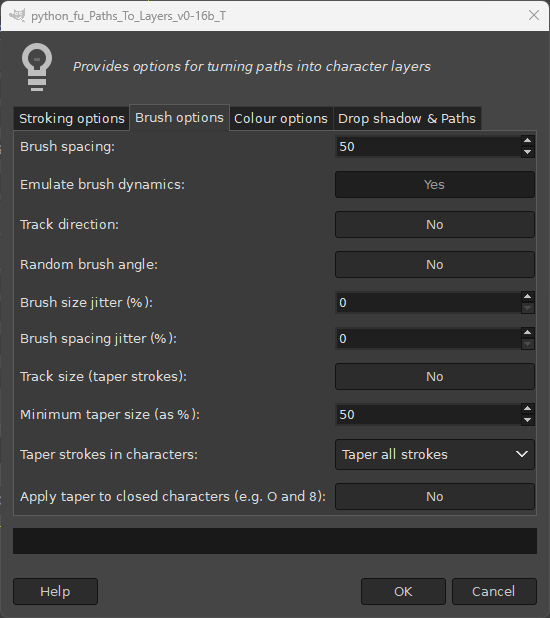
Set the ‘Brush spacing’ value to 20.
Set the ‘Track direction’ option to ‘Yes’.
Dialog Tab 3:
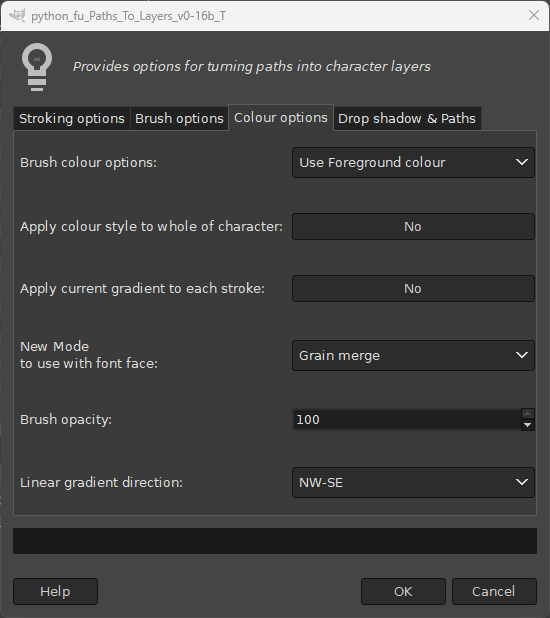
Set ‘Apply current gradient to each stroke’ to ‘Yes’.
Dialog Tab 4:

Set ‘Preview single character’ to ‘Yes’.
Enter the character you want to preview in the text box.
Click on ‘OK’.
My outcome…

The preview image gives you an opportunity to re-adjust the various option settings before committing your choices to all the characters in the file. So if you want to you can discard the preview image and alter the brush, the spacing value and the choice of gradient before trying again.
When you are happy with your choices, set the ‘Preview single character’ option to ‘No’ to apply the filter to all the characters. A word of caution: If you set the ‘Brush spacing’ to a value of 1 it will take a fair amount of time to stroke all of the characters - so it may be a good idea to take the dog for a walk while your machine is busy and remember...

Applying Taper to Characters
I have extended the choice of options for adding a taper to the strokes that make up each character.
You can now choose to apply the taper to all of the strokes, to the first stroke in a character or to all strokes apart from the first stroke.
Dialog Tab 2:

Your results will probably look better with the ‘Track direction’ option set to ‘Yes’. Click on the ‘Taper strokes in characters’ option to access the drop-down menu and choose which one of the options you want to use. Note the cross bar on the letter A in the following images.
Default option: Taper all strokes

Taper 1st stroke only

Taper all except 1st stroke

If you were wondering why the lower-case letter ‘a’ in the examples above was sometimes not affected by the taper options it is down to the fact that the round part of the character was made with a closed path. To change this behaviour set the ‘Apply taper to closed characters’ option to ‘Yes’.
The image below shows the three options applied to a closed character; it’s nice to have an occasional bit of weird.

Have fun.
 Login
Login Register
 Tweets
 FAQ
FAQ Advanced Search





