#!/usr/bin/env python
#grow-shrink-live.py
# Creator: TT
# This should allow user to adjust grow/shrink current selection with live preview
# Open Source
from gimpfu import *
import gtk

# Global variables to store the parameters used for our effect/work to show preview or actual layer when user OK it
global_param1 = 0 #in this example it's shrinkgrow radius
global_param2 = 0   #in this example it's feather_radius
global_param3 = 10  #in this example it's iterations
global_param4 = 0   #in this example it's enhance_shadows

chosen_color = 0
sample_integer = 18
pattern_ = "3,-2"
image = 0 #we'll set these when dialog() is called so that we can access them later
drawable = 0
has_preview = False
preview_layer = 0
#for this operation
selection_channel = 0
proceed_with_changes = False
def apply_effect(layer): #function to do work on either preview layer or actual drawable when user clicks OK
    global preview_layer,has_preview
    if has_preview == True:
        pdb.gimp_image_remove_vectors(image,preview_layer)
        has_preview = False
        points = int(sample_integer) #make sure it's int
        pattern = [int(x) for x in pattern_.split(',')] #make it array of ints
        vectors = pdb.gimp_image_get_active_vectors(image)
        num_strokes,stroke_ids = pdb.gimp_vectors_get_strokes(vectors)
        length = pdb.gimp_vectors_stroke_get_length(vectors,stroke_ids[0],0.1)
        sectionlength = length*1.0/points
        p = []
        #get all the points coordinates into p array
        for i in range(0,points):
            dist = sectionlength*i
            x,y,slope,valid = pdb.gimp_vectors_stroke_get_point_at_dist(vectors,stroke_ids[0],dist,0.1)
            p.append([x,y])

        cp = [] #control points
        checkpattern = [];
        currentpoint = 0;
        cp.append(currentpoint)
        firsttime=1;
        while 1==1: #loop until we break from it
            for i in range(0,len(pattern)):
                currentpoint = ((currentpoint + points) + pattern[i] ) % points;
                cp.append(currentpoint)
            if (firsttime==1):
                checkpattern = cp[:] #copy this initial pattern to know when to stop
                firsttime = 0
            else:
                good = 1
                l = len(checkpattern)
                for j in range(0,l):
                    if (cp[len(cp)-l+j]!=checkpattern[j]):
                        good = 0
                        break;
                if good==1: #it's all the same as checkpattern so we've done looping
                    cp = cp[0:-(l-1)]
                    break
        #here we have cp containing all our points index now create the path
        new_vectors = pdb.gimp_vectors_new(image,"String Art")
        pdb.gimp_image_insert_vectors(image,new_vectors,None,0)
        cpoints = []
        for i in range(0,len(cp)):
            cpoints = cpoints + (p[cp[i]]*3) #add 3 times the current point
        npoints = len(cpoints)
        stroke_id = pdb.gimp_vectors_stroke_new_from_points(new_vectors,0,npoints,cpoints,FALSE)
        pdb.gimp_item_set_visible(new_vectors,TRUE)
        preview_layer = new_vectors
        has_preview = True


    # global image
    # radius = global_param1
    # feather_radius = global_param2
    # pdb.gimp_image_select_item(image,CHANNEL_OP_REPLACE,selection_channel) #first we selected the original saved channel
    # if radius < 0:
    #     pdb.gimp_selection_shrink(image,-radius)
    # else:
    #     pdb.gimp_selection_grow(image,radius)
    # pdb.gimp_selection_feather(image,feather_radius)
    # #do something to it to show it's effect so that user can distinguish between selected area or not
    # pdb.gimp_drawable_edit_fill(layer,FILL_FOREGROUND)

    # #pdb.gimp_ellipse_select(image,image.width/2-width/2,image.height/2-height/2,width,height,CHANNEL_OP_REPLACE,TRUE,FALSE,0)
    # #pdb.gimp_drawable_invert(layer,TRUE)
    # #pdb.gimp_selection_none(image)
    # gimp.displays_flush()


def apply_final(layer): #wrapper to apply effect on final and remove preview_layer meant to be called by on_ok_button_clicked
    pass
    # global preview_layer
    # #pdb.gimp_image_undo_group_start(image) #so it's undone in Ctrl+Z
    # pdb.gimp_image_undo_enable(image) #so that user can undo this next step
    # apply_effect(preview_layer)
    # #pdb.gimp_image_undo_group_end(image)
    # if has_preview:
    #     pdb.gimp_image_remove_channel(image,selection_channel) #so that we don't leave a saved channel laying around
    #     pdb.gimp_image_remove_layer(image,preview_layer)
    # pdb.gimp_image_set_active_layer(image,drawable)
    # pdb.gimp_context_set_foreground(save_foreground)
    # gimp.displays_flush()

# Function to update the live preview
def update_live_preview(): #this is called everytime some parameter changes
    global global_param1, global_param2, global_param3, global_param4
    global image,drawable
    global has_preview,preview_layer #deal with preview layer
    # global selection_channel #this will save our current selection
    # Apply your plugin's effect using the current parameters
    # Use global_param1 and global_param2 to access the user's inputs
    if not has_preview: #create a preview layer
        # #pdb.gimp_message("Creating preview")
        # preview_layer = pdb.gimp_layer_new(image,image.width,image.height,RGBA_IMAGE,"preview",70,LAYER_MODE_NORMAL)
        # pdb.gimp_image_insert_layer(image,preview_layer,None,0) #insert top most so we see it
        # non_empty,x1,y1,x2,y2 = pdb.gimp_selection_bounds(image)
        # if non_empty == TRUE:
        #     pass #there's already a selection
        # else:
        #     pdb.gimp_selection_all(image) #if there's no selection we just select the whole image and work with that
        # selection_channel = pdb.gimp_selection_save(image)


        points = int(sample_integer) #make sure it's int
        pattern = [int(x) for x in pattern_.split(',')] #make it array of ints
        vectors = pdb.gimp_image_get_active_vectors(image)
        num_strokes,stroke_ids = pdb.gimp_vectors_get_strokes(vectors)
        length = pdb.gimp_vectors_stroke_get_length(vectors,stroke_ids[0],0.1)
        sectionlength = length*1.0/points
        p = []
        #get all the points coordinates into p array
        for i in range(0,points):
            dist = sectionlength*i
            x,y,slope,valid = pdb.gimp_vectors_stroke_get_point_at_dist(vectors,stroke_ids[0],dist,0.1)
            p.append([x,y])

        cp = [] #control points
        checkpattern = [];
        currentpoint = 0;
        cp.append(currentpoint)
        firsttime=1;
        while 1==1: #loop until we break from it
            for i in range(0,len(pattern)):
                currentpoint = ((currentpoint + points) + pattern[i] ) % points;
                cp.append(currentpoint)
            if (firsttime==1):
                checkpattern = cp[:] #copy this initial pattern to know when to stop
                firsttime = 0
            else:
                good = 1
                l = len(checkpattern)
                for j in range(0,l):
                    if (cp[len(cp)-l+j]!=checkpattern[j]):
                        good = 0
                        break;
                if good==1: #it's all the same as checkpattern so we've done looping
                    cp = cp[0:-(l-1)]
                    break
        #here we have cp containing all our points index now create the path
        new_vectors = pdb.gimp_vectors_new(image,"String Art")
        pdb.gimp_image_insert_vectors(image,new_vectors,None,0)
        cpoints = []
        for i in range(0,len(cp)):
            cpoints = cpoints + (p[cp[i]]*3) #add 3 times the current point
        npoints = len(cpoints)
        stroke_id = pdb.gimp_vectors_stroke_new_from_points(new_vectors,0,npoints,cpoints,FALSE)
        pdb.gimp_item_set_visible(new_vectors,TRUE)
        preview_layer = new_vectors
        has_preview = True #now set it true so we can deal with existing layer in later calls
    else: # already have preview layer
        pass
        #pdb.gimp_message("Removing existing and creating new Preview")
        # pdb.gimp_image_remove_layer(image,preview_layer) #remove it to create a new one to work on
        # preview_layer = pdb.gimp_layer_new(image,image.width,image.height,RGBA_IMAGE,"preview",50,LAYER_MODE_NORMAL)
        # pdb.gimp_image_insert_layer(image,preview_layer,None,0) #insert top most so we see it
    # pdb.gimp_image_set_active_layer(image,preview_layer)
    #debug message
    #pdb.gimp_message(str(global_param1)+","+str(global_param2)+","+str(global_param3)+","+str(global_param4))

    apply_effect(preview_layer)

    # Update the live preview layer with the modified image

save_foreground = 0
hilightcolor = (255,0,0)
def dialog(image_, drawable_):
    global image, drawable, save_foreground
    #if chosen_color==0:
    #   global chosen_color
    #  chosen_color = (0, 128, 255)  # Set default color
    #save these for updates
    image = image_
    #pdb.gimp_image_undo_disable(image) #for speed and also when user undo it doesn't see our preview creations/deletions
    #drawable = drawable_
    #save_foreground = pdb.gimp_context_get_foreground()
    #pdb.gimp_context_set_foreground(hilightcolor)

    dialog = gtk.Dialog("String-Art Live Preview", None, gtk.DIALOG_MODAL | gtk.DIALOG_DESTROY_WITH_PARENT)
    dialog.set_default_size(600, 100)

    #color_selection.ok_button.connect("clicked", on_color_ok_button_clicked)

    # Create an HBox to hold the label and slider -------------------------------------------------------------
    # hbox = gtk.HBox()
    # dialog.vbox.pack_start(hbox, expand=True, fill=True)

    # # Create a label on the left-hand side
    # label1 = gtk.Label("Shrink/Grow Radius:")
    # hbox.pack_start(label1, expand=False, fill=False, padding=5)

    # # Create an adjustment for the HScale (slider) with a range from 10 to 90
    # adjustment1 = gtk.Adjustment(value=0, lower=-400, upper=400, step_incr=1, page_incr=0)
    # param1_scale = gtk.HScale(adjustment=adjustment1)
    # param1_scale.set_digits(0)  # Display only integers
    # hbox.pack_start(param1_scale, expand=True, fill=True, padding=5)
    # # Connect callback functions for user interaction
    # param1_scale.connect("value-changed", on_param1_changed)

    # # # Create an HBox to hold the label and slider -------------------------------------------------------------
    # hbox2 = gtk.HBox()
    # dialog.vbox.pack_start(hbox2, expand=True, fill=True)

    # # Create a label on the left-hand side
    # label2 = gtk.Label("Feather Radius:")
    # hbox2.pack_start(label2, expand=False, fill=False, padding=5)

    # # Create an adjustment for the HScale (slider) with a range from 10 to 90
    # adjustment2 = gtk.Adjustment(value=0, lower=0, upper=400, step_incr=1, page_incr=0)
    # param2_scale = gtk.HScale(adjustment=adjustment2)
    # param2_scale.set_digits(0)  # Display only integers
    # hbox2.pack_start(param2_scale, expand=True, fill=True, padding=5)
    # # Connect callback functions for user interaction
    # param2_scale.connect("value-changed", on_param2_changed)


    # # Create an HBox to hold the label and integer/float input box =====================================================
    hbox4 = gtk.HBox()
    dialog.vbox.pack_start(hbox4, expand=True, fill=True)

    # Create a label for the integer input
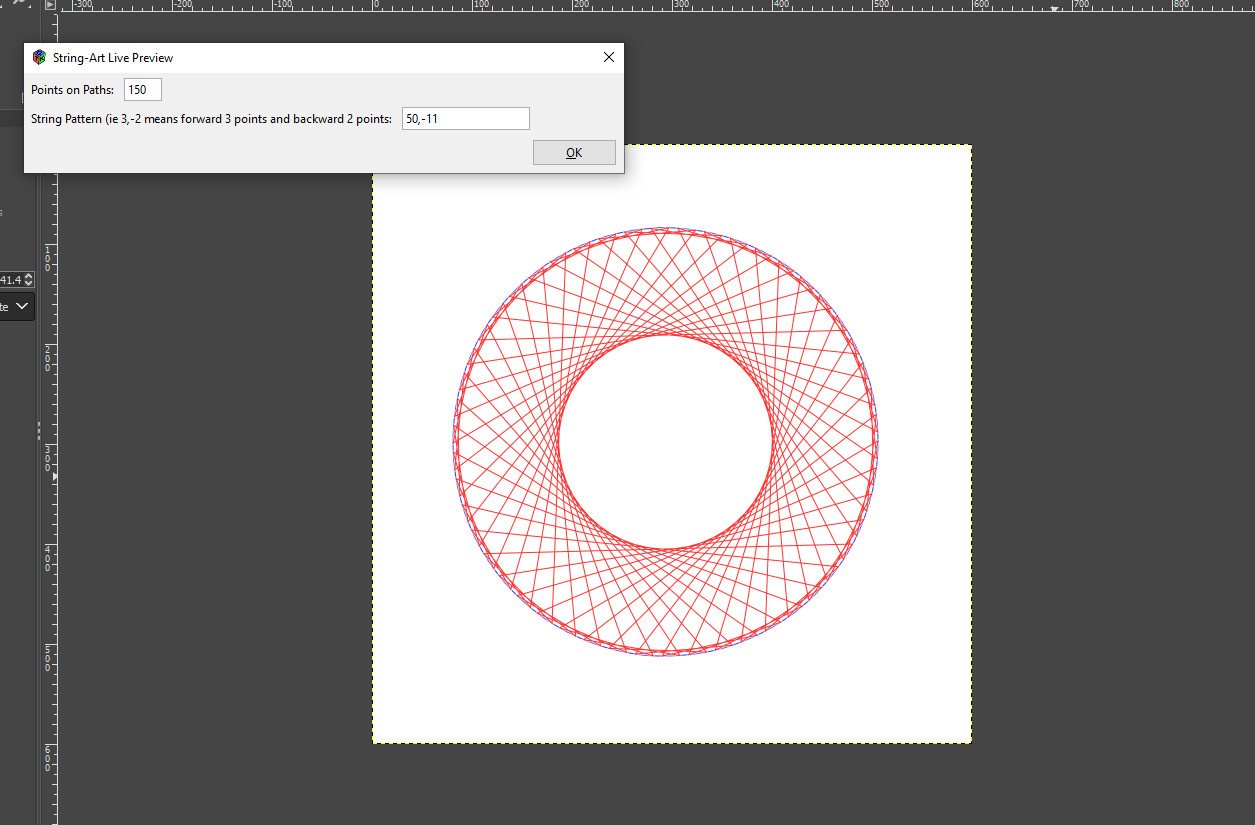
    label4 = gtk.Label("Points on Paths:")
    hbox4.pack_start(label4, expand=False, fill=False, padding=5)

    # Create a text entry for the integer input
    entry4 = gtk.Entry()
    entry4.set_text(str(sample_integer))
    entry4.set_width_chars(5)  # Adjust the width of input box as needed
    entry4.connect("changed", on_sample_integer_changed)
    hbox4.pack_start(entry4, expand=False, fill=False, padding=5)


    hbox5 = gtk.HBox()
    dialog.vbox.pack_start(hbox5, expand=True, fill=True)

    # Create a label for the integer input
    label5 = gtk.Label("String Pattern (ie 3,-2 means forward 3 points and backward 2 points:")
    hbox5.pack_start(label5, expand=False, fill=False, padding=5)

    # Create a text entry for the integer input
    entry5 = gtk.Entry()
    entry5.set_text("3,-2")
    entry5.set_width_chars(20)  # Adjust the width of input box as needed
    entry5.connect("changed", on_pattern_changed)
    hbox5.pack_start(entry5, expand=False, fill=False, padding=5)

    # Create an HBox to hold the label and color picker button =================
    # hbox5 = gtk.HBox()
    # dialog.vbox.pack_start(hbox5, expand=True, fill=True)

    # # Create a label for the color picker
    # label5 = gtk.Label("Color Picker:")
    # hbox5.pack_start(label5, expand=False, fill=False, padding=5)

    # # Create a color picker button
    # color_button = gtk.ColorButton()
    # color_button.set_use_alpha(False)  # Set to True if you want to include alpha channel
    # #default_color = gtk.gdk.Color(65535, 0, 0)  # Red in RGB, where values are between 0 and 65535
    # pdb.gimp_message("set:" + str(chosen_color[0]))
    # color_button.set_color(gtk.gdk.Color(chosen_color[0]*256, chosen_color[1]*256, chosen_color[2]*256))
    # color_button.connect("color-set", on_color_changed)
    # hbox5.pack_start(color_button, expand=False, fill=False, padding=5)

    # #toggle button ==============
    # hbox6 = gtk.HBox()
    # dialog.vbox.pack_start(hbox6, expand=True, fill=True)

    # label6 = gtk.Label("Sample Toggle:")
    # hbox6.pack_start(label6, expand=False, fill=False, padding=5)
    # toggle_button = gtk.ToggleButton()

    # # Set initial label
    # update_toggle_button_label(toggle_button)
    # # Connect the toggle event
    # toggle_button.connect("toggled", on_toggle_button_toggled)
    # hbox6.pack_start(toggle_button, expand=False, fill=False, padding=5)


    # #Combo box ===================================
    # hbox7 = gtk.HBox()
    # dialog.vbox.pack_start(hbox7, expand=True, fill=True)

    # label7 = gtk.Label("Sample Choice:")
    # hbox7.pack_start(label7, expand=False, fill=False, padding=5)

    # toggle_button = gtk.ToggleButton()
    # # Create a ComboBox
    # combo_box = gtk.ComboBox()
    # hbox7.pack_start(combo_box, expand=False, fill=False, padding=5)

    # # Create a ListStore model for ComboBox
    # list_store = gtk.ListStore(str)
    # options = ["Option 1", "Option 2", "Option 3"]  # Add your options here
    # for option in options:
    #     list_store.append([option])

    # # Set the model for ComboBox
    # combo_box.set_model(list_store)

    # # Create a CellRendererText to render the text in the ComboBox
    # cell_renderer = gtk.CellRendererText()

    # # Pack the CellRendererText into the ComboBox
    # combo_box.pack_start(cell_renderer, True)
    # combo_box.add_attribute(cell_renderer, 'text', 0)

    # # Set up the "changed" signal handler
    # combo_box.connect("changed", on_combobox_changed)

    # # Set the default option to "Option 1" ======================================
    # default_option = "Option 1"
    # default_iter = list_store.get_iter_first()
    # while default_iter is not None:
    #     if list_store.get_value(default_iter, 0) == default_option:
    #         combo_box.set_active_iter(default_iter)
    #         break
    #     default_iter = list_store.iter_next(default_iter)
    # #===========================================================================

#     color_selection.show_all()
#     color_selection = gtk.ColorSelectionDialog("Select Color")
#     # Run the dialog
#     response = color_selection.run()

#     # Connect the "clicked" signal after the dialog has been shown
#     color_selection.ok_button.connect("clicked", on_color_ok_button_clicked)

# # Check the response and destroy the dialog
#     if response == gtk.RESPONSE_OK:
#         on_color_ok_button_clicked(color_selection)
#     else:
#         color_selection.destroy()

    # hbox3 = gtk.HBox()
    # dialog.vbox.pack_start(hbox3, expand=True, fill=True)

    # # Create a label on the left-hand side
    # label3 = gtk.Label("iterations:")
    # hbox3.pack_start(label3, expand=False, fill=False, padding=5)

    # # Create an adjustment for the HScale (slider) with a range from 10 to 90
    # adjustment3 = gtk.Adjustment(value=10, lower=1, upper=30, step_incr=1, page_incr=0)
    # param3_scale = gtk.HScale(adjustment=adjustment3)
    # param3_scale.set_digits(0)  # Display only integers
    # hbox3.pack_start(param3_scale, expand=True, fill=True, padding=5)
    # # Connect callback functions for user interaction
    # param3_scale.connect("value-changed", on_param3_changed)

    # Add an OK button
    ok_button = dialog.add_button(gtk.STOCK_OK, gtk.RESPONSE_OK)
    ok_button.connect("clicked", on_ok_button_clicked)
    # Show the dialog
    dialog.show_all()
    update_live_preview() #call this once so we see effect
    dialog.run()

# def on_combobox_changed(combobox):
#     global selected_option
#     model = combobox.get_model()
#     active_iter = combobox.get_active_iter()

#     if active_iter:
#         selected_option = model.get_value(active_iter, 0)
#         pdb.gimp_message("Selected option:" + str(selected_option))

# def on_toggle_button_toggled(button):
#     global proceed_with_changes
#     proceed_with_changes = not proceed_with_changes
#     pdb.gimp_message("Sample toggle result:" + str(proceed_with_changes))
#     update_toggle_button_label(button)

# def update_toggle_button_label(button):
#     label = "Yes" if proceed_with_changes else "No"
#     button.set_label(label)


def on_sample_integer_changed(entry):
    global sample_integer
    try:
        sample_integer = float(entry.get_text()) #int(entry.get_text())
        #pdb.gimp_message(sample_integer)
        update_live_preview()
    except ValueError:
        # Handle the case where the input is not a valid integer
        pass

def on_pattern_changed(entry):
    global pattern_
    try:
        pattern_ = str(entry.get_text()) #int(entry.get_text())
        #pdb.gimp_message(pattern_)
        update_live_preview()
    except ValueError:
        # Handle the case where the input is not a valid integer
        pass

# #need these 2 functions for color picker(s)
# def on_color_changed(widget, data=None):
#     global chosen_color
#     pdb.gimp_message("ran color")
#     color = widget.get_color()
#     chosen_color = (int(color.red/256), int(color.green/256), int(color.blue/256))
#     pdb.gimp_message(str(chosen_color[0]))
#     update_live_preview()

# def on_color_ok_button_clicked(dialog, data=None):
#     pdb.gimp_message("color clicked")
#     global selected_color
#     color = color_selection.get_current_color()
#     selected_color = (int(color.red * 255), int(color.green * 255), int(color.blue * 255))
#     pdb.gimp_message(selected_color[0])
#     update_live_preview()
#     dialog.destroy()

# Callback function for updating the live preview when param1 changes
# def on_param1_changed(scale):
#     global global_param1
#     global_param1 = scale.get_value()
#     update_live_preview()

# # Callback function for updating the live preview when param2 changes
# def on_param2_changed(scale):
#     global global_param2
#     global_param2 = scale.get_value()
#     update_live_preview()

# def on_param3_changed(scale):
#     global global_param3
#     global_param3 = scale.get_value()
#     update_live_preview()

# Callback function for the OK button
def on_ok_button_clicked(button, data=None):
    global drawable
    apply_final(preview_layer) #preview layer because we don't want to apply the invert to final layer it's just for viewing
    button.get_toplevel().destroy() #destroys the gtk dialog window
# Register the Python-Fu plugin
register(
    "python_fu_string_art_live",
    "Grow/Shrink Current Selection with Live Preview",
    "Grow/Shrink Current Selection with Live Preview",
    "TT",
    "TT",
    "2023.12.09",
    "<Image>/Python-Fu/Live Preview/String Art Live",  # Menu location
    "*",  # Image type
    [],
    [],
    dialog
)

main()
 Login
Login Register
 Tweets
 FAQ
FAQ Advanced Search