It is currently Thu Nov 19, 2026 7:52 pm


All times are UTC - 5 hours [ DST ]


Post new topic Reply to topic  [ 32 posts ]  Go to page 1, 2  Next
Author Message
 Post subject: fake painting: the fortune teller
PostPosted: Sun Feb 24, 2013 3:37 am  (#1) 
Offline
GimpChat Member
User avatar

Joined: Aug 16, 2012
Posts: 4271
Location: Göteborg, Sweden
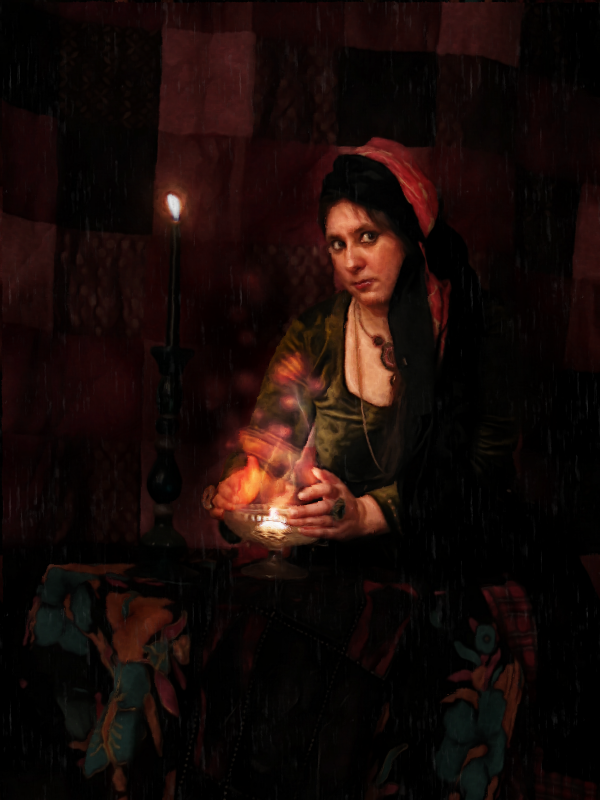
i had a small project going this autumn that i called "the fortune teller". i took some photos and i wanted to tweak them to give them a mystical, magical atmosphere. i liked the result and thought it looked a bit like early baroque (or late renaissance) paintings, so i tried to make it into a fake painting but got no good results and gave it up. yesterday i suddenly had an idea, i tried it and it worked. so here is my faked baroque fortune teller painting.
Image

_________________


Share on Facebook Share on Twitter Share on Orkut Share on Digg Share on MySpace Share on Delicious Share on Technorati
Top
 Post subject: Re: fake paiting: the fortune teller
PostPosted: Sun Feb 24, 2013 4:03 am  (#2) 
Offline
GimpChat Member
User avatar

Joined: Jan 20, 2013
Posts: 14835
Location: roma, italy
really excellent!

_________________
"Where am I ?"


Top
 Post subject: Re: fake paiting: the fortune teller
PostPosted: Sun Feb 24, 2013 7:22 am  (#3) 
Offline
GimpChat Member
User avatar

Joined: Apr 07, 2010
Posts: 14182
Very nice AnMal.

_________________
Image


Top
 Post subject: Re: fake paiting: the fortune teller
PostPosted: Sun Feb 24, 2013 10:07 am  (#4) 
Offline
GimpChat Member
User avatar

Joined: Sep 22, 2012
Posts: 2089
Location: US
Not sure what you did, AnMal, but it really does look like a painting. To get even more realistic baroque look i would add some tiny cracks to it, but it's just me with crazy, over the top ideas as usual.


Top
 Post subject: Re: fake paiting: the fortune teller
PostPosted: Sun Feb 24, 2013 10:09 am  (#5) 
Offline
GimpChat Member
User avatar

Joined: Sep 24, 2010
Posts: 12863
Big fan of the Dutch period AnMal; excellent result. :)

_________________
Lyle

Psalm 109:8

Image


Top
 Post subject: Re: fake paiting: the fortune teller
PostPosted: Sun Feb 24, 2013 12:49 pm  (#6) 
Offline
GimpChat Member

Joined: Dec 20, 2010
Posts: 174
Location: Wherever the voices in my head tell me I am.
AnMal,

That really is a lovely result. It would be interesting to see the original photos that are the basis for this piece. Just to get a before and after perspective. Very well done.

:)


Top
 Post subject: Re: fake paiting: the fortune teller
PostPosted: Sun Feb 24, 2013 12:54 pm  (#7) 
Offline
GimpChat Member
User avatar

Joined: Aug 30, 2012
Posts: 2174
AnMal - Excellent results. :bigthup

_________________
Image


Top
 Post subject: Re: fake paiting: the fortune teller
PostPosted: Sun Feb 24, 2013 6:04 pm  (#8) 
Offline
GimpChat Member
User avatar

Joined: Aug 16, 2012
Posts: 4271
Location: Göteborg, Sweden
dinasset: thank you very much!
molly: thank you!
k1tesseraena: hehe, talking of crazy and over the top ideas: i want two different crack patterns, one with small cracks going in both directions, like a very irregular grid, another with longer vertical cracks and hardly any horizontal ones. that's what i had decided from the first and i'm not compromising, even if it will probably take ages finding the textures (i have tried making them, but the result looks awful). it's the right cracks or no cracks at all, but i keep looking!
lylejk: thank you! means a lot coming from you, you're sort of king of this kind of tricks :).
ccbarr: thank you :)! i will post the original picture here, and also a link to the thread where you can see what it looked like after i had made my first set of manipulations.
he4rty: thank you!

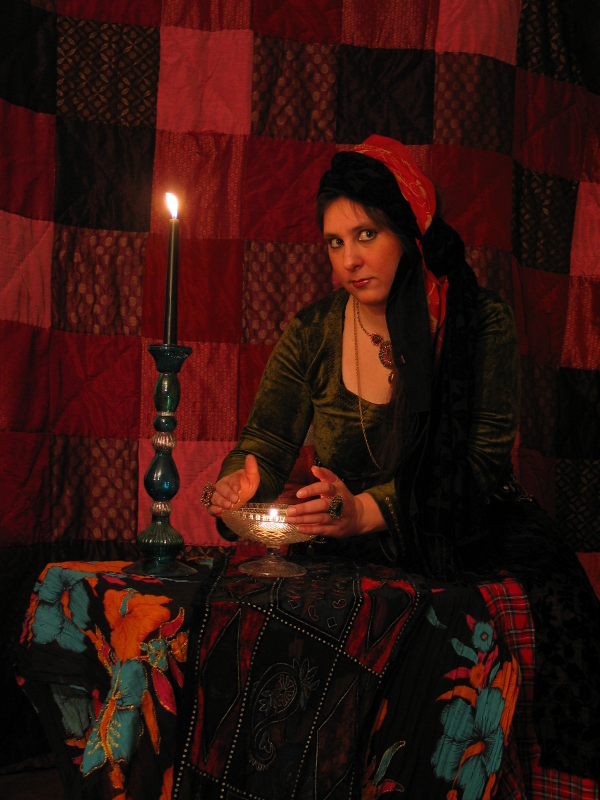
here's what the original looked like (it's scaled down):
Image

and here's the thread where my first set of manipulations are shown:
http://www.gimpchat.com/viewtopic.php?f=18&t=5606&hilit=fortune+teller+project

the fake painting was made from one of the last edits in that thread and i used thin brush smoothing with extreme settings, which gives a painted effect, but i thought it needed something more. i tried to make textures to give the illusion of brush strokes, but they didn't work very well. what i did two days ago that i hadn't tried before was this: running lylejk's painting (g'mic filter) on the picture (after i had made a few tweaks to add spots with slightly bleached colours and other such details), desaturating the result, setting it to lighten only, pull the opacity down to 4 and then use the same layer as a displacement map on the original layer, with a displacement degree of 1 in both directions
.

_________________


Top
 Post subject: Re: fake paiting: the fortune teller
PostPosted: Sun Feb 24, 2013 6:04 pm  (#9) 
Offline
GimpChat Member

Joined: Apr 12, 2010
Posts: 5870
:jumpclap :jumpclap :jumpclap i love it !

I had gimp opened and so i think to try a new preset i just created for gmic Asinotropic Smoothing
i use from then was no gmic but only that filter called then GREYCstoration, i was sure to have understand most of the controls but was 1 important i missed till now

back to your cool fake painting, in gmic there is a cool filter (Artistic/Photoillustration) that i very seldom used , but i remember that works well to ... to merge even more compositions from different sources ...humm...as example a photomontage

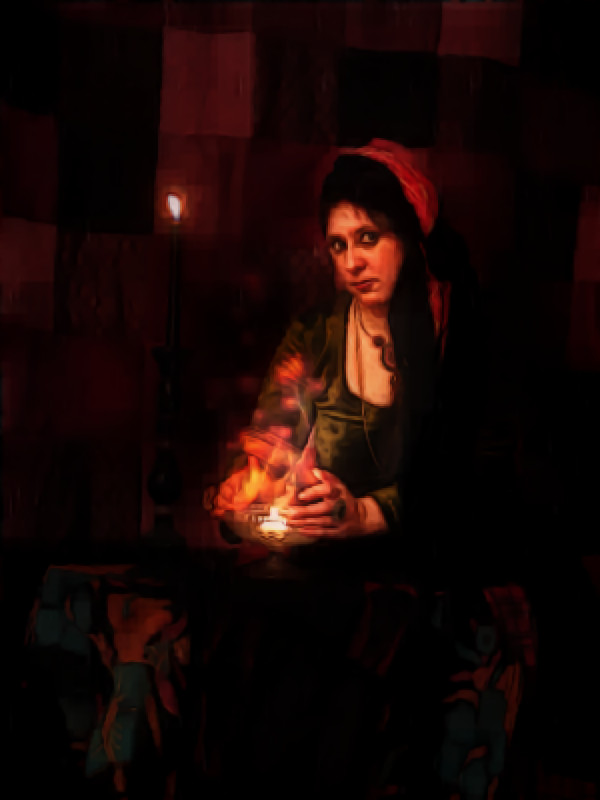
And so i tried both here i show one , in the xcf are other 3 variants, in the name of each edited layer are embedded the parameters i used (that may be reused from gmic/Various/custom code (local) ...just pasting all AFTER the ":" so the highlighted part (as [G'MIC] Photoillustration : -gimp_tk_photoillustration 0,0.25,6,0.3,0.5,0.5,1,3,5,6.09756,1.07724,0,0,1,0,0,1.36585,98.5,5,0.617886,0,0,1,0,0,1,0 )

Image

above the combination of PhotoIllustration ,followed by my new preset for .. sharp smoothing :
in the xcf also the 2 effects separated , and a sharper variation of my last sharp_smoothing preset

PS
With this effect there is a detail to correct manually ,( the height is between nose and lips .on the left edge of her face )


Attachments:
filename.xcf [4.2 MiB]
Downloaded 180 times

_________________
My 3D Gallery on Deviantart http://photocomix2.deviantart.com/
Main gallery http://www.flickriver.com/photos/photocomix-mandala/
Mandala and simmetry http://www.flickriver.com/photos/photocomix_mandala/

Image

Mrs Wilbress


Last edited by PhotoComix on Sun Feb 24, 2013 6:24 pm, edited 3 times in total.
Top
 Post subject: Re: fake paiting: the fortune teller
PostPosted: Sun Feb 24, 2013 6:08 pm  (#10) 
Offline
GimpChat Member

Joined: Apr 12, 2010
Posts: 5870
AnMal we :ninja :
what i posted is a very slight variation of your fake painting, i had not saw yet the original image when i uploaded :)

In other word is based on your edited version and the intention was too see how much softly that combination could be used not for dramatic editing as usual buton the contrary for a sort of slightly different fine tuning )

_________________
My 3D Gallery on Deviantart http://photocomix2.deviantart.com/
Main gallery http://www.flickriver.com/photos/photocomix-mandala/
Mandala and simmetry http://www.flickriver.com/photos/photocomix_mandala/

Image

Mrs Wilbress


Last edited by PhotoComix on Sun Feb 24, 2013 6:13 pm, edited 1 time in total.

Top
 Post subject: Re: fake paiting: the fortune teller
PostPosted: Sun Feb 24, 2013 6:12 pm  (#11) 
Offline
GimpChat Member
User avatar

Joined: Aug 16, 2012
Posts: 4271
Location: Göteborg, Sweden
photo comix: that's so cool! :jumpclap i've never tried recalling a g'mic effect by using the parameter figures before, but i will definitely start now.

_________________


Top
 Post subject: Re: fake paiting: the fortune teller
PostPosted: Sun Feb 24, 2013 6:39 pm  (#12) 
Offline
GimpChat Member

Joined: Apr 12, 2010
Posts: 5870
AnMal wrote:
photo comix: that's so cool! :jumpclap i've never tried recalling a g'mic effect by using the parameter figures before, but i will definitely start now.


i saved also as preset, let me find the preset file

ok this are for Anisotropic Smoothing , (finally i got how use "value precision")


{AS-PC_precise-smoothing}{PhotoComiX smoothing}{gimp_anisotropic_smoothing}{gimp_anisotropic_smoothing}{60}{0.216216}{0.718919}{0.6}{2.35}{0.8}{19.3838}
{0.444324}{0}{1}{1}{0}{1}


and this is what i used for PhotoIllustration ... not that this setting have something special i mean i just started to explore what may do and has so many different options.

anyway my setting (again as "FAV" ; to import the fav you may copy and paste the code at the end of your gmic_faves file )

[G'MIC] Photoillustration : -gimp_tk_photoillustration 0,0.25,6,0.3,0.5,0.5,1,3,5,6.09756,1.07724,0,0,1,0,0,1.36585,98.5,5,0.617886,0,0,1,0,0,1,0

EDIT
PS this i did not use here but may be interesting

But i did to use in this way
1)copy the original on a new layer (or set gmic output to "new layer(s)" )
2 )run the preset
3 )now move the layer with the original on top and change mode to soft light , or if the image could be darkened to multiply...and lower opacity at taste

Effect change much according to image size :
bigger the image more will be soft and moderate
and vice versa

here the preset (it really wanted sneak in, before i posted by mistake with the other , but is something else...whatever is it seems that badly want be shared :lol )

[code]{GN-clean paint}{Graphic Novel}{gimp_graphic_novelfxl}{gimp_graphic_novelfxl}{1}{2}{6}{5}{20}{0}{0.24}{6}{0}{1}{0.34}{0.53}{3.3}{0}{0}{2}{1}{1}{1}{0.5}{0.8}{1.7}[/code]

_________________
My 3D Gallery on Deviantart http://photocomix2.deviantart.com/
Main gallery http://www.flickriver.com/photos/photocomix-mandala/
Mandala and simmetry http://www.flickriver.com/photos/photocomix_mandala/

Image

Mrs Wilbress


Last edited by PhotoComix on Sun Feb 24, 2013 6:52 pm, edited 1 time in total.

Top
 Post subject: Re: fake paiting: the fortune teller
PostPosted: Sun Feb 24, 2013 6:47 pm  (#13) 
Offline
GimpChat Member
User avatar

Joined: Sep 22, 2012
Posts: 2089
Location: US
AnMal wrote:
k1tesseraena: hehe, talking of crazy and over the top ideas: i want two different crack patterns, one with small cracks going in both directions, like a very irregular grid, another with longer vertical cracks and hardly any horizontal ones. that's what i had decided from the first and i'm not compromising, even if it will probably take ages finding the textures (i have tried making them, but the result looks awful). it's the right cracks or no cracks at all, but i keep looking!


I should've kept my mouth shut! Tried to find fine cracks patterns myself, even among micro patterns and brushes, and they are all not good. Looked up the real hi-res old paintings and the crack pattern is quit specific but i'm pretty sure they are someplace out there. Keep looking, AnMal. I've made some phone calls to the best museums in the world, they can't wait to get your painting.


Top
 Post subject: Re: fake paiting: the fortune teller
PostPosted: Sun Feb 24, 2013 7:02 pm  (#14) 
Offline
GimpChat Member

Joined: Apr 12, 2010
Posts: 5870
Quote:
Tried to find fine cracks patterns myself, even among micro patterns and brushes, and they are all not good
.did you try ...ohh how to say in english ...

That textures created when wet clayey soil is hit by intense sun and heat and cracks
i will search something alike, duplicate ,and then turn to negative

original, or the negative , or a offsetted combination should do the trick
.. i imagine , just a guess :paint

_________________
My 3D Gallery on Deviantart http://photocomix2.deviantart.com/
Main gallery http://www.flickriver.com/photos/photocomix-mandala/
Mandala and simmetry http://www.flickriver.com/photos/photocomix_mandala/

Image

Mrs Wilbress


Top
 Post subject: Re: fake paiting: the fortune teller
PostPosted: Sun Feb 24, 2013 10:55 pm  (#15) 
Offline
GimpChat Member
User avatar

Joined: Sep 22, 2012
Posts: 2089
Location: US
Following the advice by PhotoComix I found and tried this cracked soil pattern. It worked quite well on your image.
The attachment is a 700 x 700 tilable png image. I scaled it down in gimp to 2 different sizes, desaturated, adjusted curves (upper third of the value curve all the way up) and saved as two patterns (bigger and smaller size cracks) which i later used to bucket fill the transparent layers above, setting them to soft light and grain merge blend modes, then duplicated portrait, placed it atop all layers with multiply blend mode and applied layer mask with radial BW gradient to highlight the center of the 'painting' around candle lights and darken the edges. Yeah, I know, Baroque style ;)


Attachment:
SoilCracked.png
SoilCracked.png [ 784.11 KiB | Viewed 2237 times ]


Top
 Post subject: Re: fake paiting: the fortune teller
PostPosted: Sun Feb 24, 2013 11:17 pm  (#16) 
Offline
GimpChat Member

Joined: Apr 12, 2010
Posts: 5870
@ K1TesseraEna

that is cool and should even offer a lot of possible variation and different uses..

as example the opposite of restoring, simulating a badly damaged painting that is peeling away

1) if there is not already, add a alpha channel
2 ) select the black cracks only ,all or the darkest ,
3 ) Chose a adapt merging mode as you would have done to add a texture effect
4) add below a layer filled with texture of a rough canvas ,even better if old & eroded looking
5) add to the top layer a layermask initialized to the selection :
you want the black of the cracks become transparent to show the damaged canvas below

(obvious variation of this variation would be simulate a graffiti peeling away, by showing the added texture of the wall below )


Getting a lot of idea tonight...this variation should give a good "peeled away" effect

_________________
My 3D Gallery on Deviantart http://photocomix2.deviantart.com/
Main gallery http://www.flickriver.com/photos/photocomix-mandala/
Mandala and simmetry http://www.flickriver.com/photos/photocomix_mandala/

Image

Mrs Wilbress


Top
 Post subject: Re: fake paiting: the fortune teller
PostPosted: Sun Feb 24, 2013 11:27 pm  (#17) 
Offline
GimpChat Member
User avatar

Joined: Sep 22, 2012
Posts: 2089
Location: US
PC, your method is good, I tried a few variations and it worked well too. It's not like i'm teaching AnMal how to do things in gimp, :hehe , she is a grown up girl, knows her ways around gimp ;)

Most importantly, it's not hard to find a texture, it's hard to find a tilable one. And this one is.


Top
 Post subject: Re: fake paiting: the fortune teller
PostPosted: Mon Feb 25, 2013 12:12 am  (#18) 
Offline
GimpChat Member

Joined: Apr 12, 2010
Posts: 5870
I am just playing with the new tool, gimpainter and so tonight i am attracted by topics regarding digital painting , painting emulation and the alike as a moth to the light ...

_________________
My 3D Gallery on Deviantart http://photocomix2.deviantart.com/
Main gallery http://www.flickriver.com/photos/photocomix-mandala/
Mandala and simmetry http://www.flickriver.com/photos/photocomix_mandala/

Image

Mrs Wilbress


Top
 Post subject: Re: fake paiting: the fortune teller
PostPosted: Mon Feb 25, 2013 1:40 am  (#19) 
Offline
GimpChat Member
User avatar

Joined: Apr 27, 2010
Posts: 1510
Location: Sweden
That does look painter-ly AnMal, a very nice and atmospheric result!

For applying a cracked pattern (such as the soil pattern above), I would suggest breaking up the pattern by selectively deleting the cracks with a large soft-edged brush; real paintings have a patina which will create a range of patches that is different than the pressure/dry-related cracking of clay.
.
Griatch

_________________


Top
 Post subject: Re: fake paiting: the fortune teller
PostPosted: Mon Feb 25, 2013 10:21 am  (#20) 
Offline
GimpChat Member
User avatar

Joined: Aug 16, 2012
Posts: 4271
Location: Göteborg, Sweden
k1tesseraena: thank you for finding that texture, i did look at some caked mud textures but they were a bit too rough - this one looks smoother and better and i will try it as soon as i have the time. i'm still looking for more textures too, i want to alternate between long, stripey vertical cracks and this sort.
photo comix: like i said i did look at dry mud. i also tried a lichen pattern that i have, but most of what i tried was a bit too rough.
griatch: thank you! my plan is actually to create a crack layer with two crack patterns alternating - i once stood looking at an old painting and saw that the light ochre tones used in the highlighted areas were cracked one way and the dark red and brown tones used for the darker areas were cracked in another way. i want to try and recreate this, and if i can't do it i'd rather not have cracks at all :).

_________________


Top
Post new topic Reply to topic  [ 32 posts ]  Go to page 1, 2  Next

All times are UTC - 5 hours [ DST ]


* Login  


Powered by phpBB3 © phpBB Group