I needed to add an outline to a set of custom font layers and, after adding the twentieth outline to the 98 layers in the custom font file, I decided that scripting would probably save me from a bad case of RSI in the wrist region. This filter is the result - it may be of some use to other Custom Fonters. I am fairly sure (although I no longer have a copy of Gimp 2.8) that it will only work on Gimp 2.10.
Attachment:
Attachment:
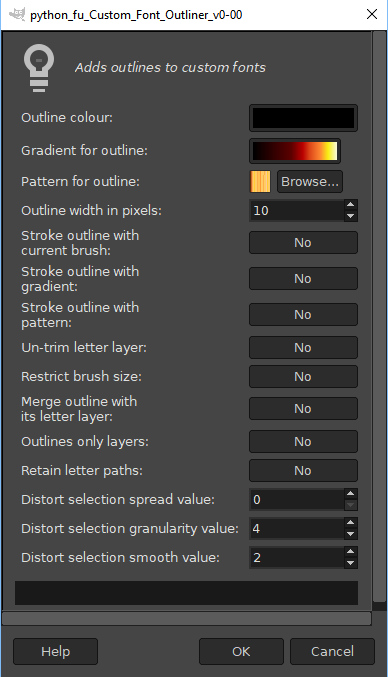 Filter_Dialog.jpg [ 136.81 KiB | Viewed 4118 times ]
You can use it to add outlines to an existing custom font file i.e. a file where the layers are named as separate letter layers or layers with letters and with the .png extension added. Other layers (including space/space.png) are ignored.
The outlines can be kept as a separate layer above the existing one, merged with the existing layer or used to replace the original layer.
The filter can produce four different types of outlines -
1) Simple outline: With all the stroke options set to ‘No’ the filter will use the outline colour from the dialog to create an outline at the specified width.
2) Gradient outline: The filter will use the currently selected gradient and its related options to colour the outline.
3. Pattern outline: The filter will use the currently selected gradient and its related options to colour the outline.
4. Brushed outline: The filter will use the currently selected brush and its related options to colour the outline. A good range of effects can be created by experimenting with the dynamics options – especially the random brush size, opacity, colour and spacing dynamics settings.
The three distort settings provide values to use with the plug-in like those that can be accessed with ‘Distort’ option from the Select menu. When the spread value is set to a number greater than zero the outline will be given a random path to follow. It is probably better to use lower values or the outline will stray beyond the boundaries of the original letter layer and leave gaps. Higher values can, however, produce some interesting outline only letter designs.
Tips for using the filter:
If the filter fails in your version of Gimp 2.10 with an error message "Unable to run GimpPdbProgress callback. The corresponding plug-in may have crashed." please download the version without the outline colour selector from post #6 - this is exactly the same plugin but it just uses the currently selected foreground colour as the border colour.Try out different effects on a small test file that contains only one or two letter layers.
The ‘Undo’ key combination is definitely your friend - especially when using the distort options of this filter.
If the original letters disappear, leaving an empty layer, check the layer visibility in the layers dialog. If the layer has no content then try setting the ‘Un-trim letter layer’ option.
When using the brush to stroke the outlines option keep one eye on the default size of brushes - especially when you change brushes. If the brush is much larger than the outline width it can overwhelm the letter shape. If the brushed stroke looks much fuzzier than you were expecting, try increasing the hardness of the brush.
If the outline layer shows a clipped effect it may be that the original letter layer does not have enough space at its left and right margins. Either use a smaller brush size or increase the size of layer to resolve the clipped effect. There is an option to restrict the size of the brush to the outline width, but this may produce too small a stroke.
Edit: Post #6 fix for error message reported by Blighty II
Some sample outputs:
Attachment:
 Samples.jpg [ 936.07 KiB | Viewed 4118 times ]
 Login
Login Register
 Tweets
 FAQ
FAQ Advanced Search